
Declare Your Status!
_____
Following are the steps and guidance to help you begin the process for correcting your “mistaken” political identity as an incorporated U.S. Citizen to an unincorporated ‘self-governing’ Michigan American State National. Note: You need to be 21 years of age to complete this process.
It is highly recommended that you carefully review the content on this website and read through the instructions, advice, and 1779 & 928 documents to help you gain perspective and to aid you in finding some answers to your questions. By now you should have watched ‘Changing Your Status’ with this Series of Short Videos.
What you are contemplating is a valuable, life-changing decision. You should take some time to learn about each American status and the associated responsibilities. After you go through this website content, the 1779 and 928 content, if you have not done so yet, you should contact the Michigan Assembly Coordinator to discuss your intention to ‘Declare Your Status.’ Do so by sending a message via our Contact Us page. Then you will begin to receive a series of emails from the Coordinator loaded with educational materials, information, links to guides, and the link to your Recording Secretary, who will help you through the papering-up process.
Important! Read everything very carefully!
Note: You are about to begin the process of doing the most important paperwork of your life. Be a steward of this paperwork. Make it look as professional as possible. Avoid scribbling, scratching things out. Type the info whenever possible, if you must print info, make it as neat and readable as you can. This paperwork is meant to defend you if/when needed, so pay attention to detail and follow the instructional guide steps.
What is Recording? When a Recording Secretary 'records' your paperwork, that is equivalent to a Notary 'notarizing' your paperwork. Similar witness process, different terminology. So, it is important that you download and use the document with the correct witness block at the bottom of the paperwork. When you use the State of State Notary paperwork, you can go to your bank or credit union and get your paperwork notarized, usually for free. Or use a Notary at places such as the UPS Store and you'll pay a fee. (Around $10 per witness block) When you use the Recording Secretaries paperwork, your RS will be your witness and Record your documents. There is a fee of $25. That fee applies for the paperwork done at the time of the 1779 Declaration and then again later when you do your set of 928 paperwork. Note: Not all of our Recording Secretaries have stamps and seals at this time, so we recommend State of State Notary paperwork. And to be very clear, you do not pay a fee for Notarizing and Recording both, it's either/or, you only pay for the method you choose. What is Publishing? Once your paperwork has been Notarized or Recorded, it needs to be published (made public). You are making a public declaration. You can have it published at your County Recorders Office, or published in newspapers, or published at the Land Recording System (LRS). Each of these methods have fees. Here on Michigan, your Recording Secretary will publish your paperwork at the Land Recording Office (LRO), where it can be viewed via the Everify website. Each set of paperwork has a $25 fee. Fee Breakdown when using Recording Secretaries: 1. 1779 Declaration set w/docs from D-I: $25 for Recording, $25 for Publishing The Land Recording Office (LRO) Since this is where your paperwork will be published by your Recording Secretary, you will need to get an account on the LRO. If you are married and you and your spouse are both planning to become American State Nationals, you each will need to set up an account. Your own documents are published in your own account and your fees are paid in your own account. Each man and woman declares their own standing on the LRO. 1. Go to: https://members.americanstatenationals.us/ 2. Under Non Members click the Create Your Member Account 3. Type in your email address. (Important Note: if a box appears saying your 'email address is already in use' immediately contact your Recording Secretary or use the Contact Us page to send a message to the State Coordinator. An account for you may have already been set up from a previous communication to add you to an email list. You will receive information on how to log in and update your account information.) 4. The New Account Page will be presented, complete all the required fields. 5. For the Born field use the date picker so that the data field is properly formatted. 6. For the Upload images, that is explained in Guide Steps 3 for the Credential Cards and can be done at that time. 7. Click the Sign Up button to submit the form. Paying Fees in the LRO 1. In the LRO, click on the Fees tab. Explore the LRO 1. Check out the different tabs and become familiar with what is there. 2. Participation Tab: Check which jobs you might be interested in doing and what your skills are for serving. 3. Documents Tab: Please take note that each of your documents have a separate location for uploading. Therefore, you will need to make a separate pdf for each document you send to your Recording Secretary. Do not scan and put them all in one pdf. IMPORTANT - please read!! - It would be dangerous to alter any of the cited legal jargon and address styles because you would take the risk of not addressing the presumptions that you need to rebut, and you would lose the proper status and protections you want. You only need to replace the red text with your personal information. Exception: You may need to change wording in certain documents for your personal situation, such as... - The Living Law Firm researchers have spent decades piecing together all the necessary details of what it is we need to specifically rebut in this paperwork. - The documents cite legal-law verbiage from many sea and air jurisdictions that go back 200 years, derived from old court documents, law libraries, corporate government codes, etc. Their specific words and styles need to be cited to show proof of the fraud we are stopping. - The foreign corporations created many onion layers and webs to ensnare each of us. - Each corporate jurisdiction has their own differently defined legal terms and definitions, therefore, the words must remain "as is" in order to cite the many jurisdiction from a two-century time frame. - We need to show all government and corporate entities that we are an organized and sensible people, and here's why... if our paperwork is NOT consistent, it makes for confusion and further difficulty when entities of other jurisdictions try to view the proof of our status. We need to be consistent professionals in having our paperwork be an easy and simple read, and this is achieved when they are consistently citing exactly the same presumptions. - In the notary block, do not change the state and county on the documents to a 'state of state' or 'county of'. This could move you right back into the sea jurisdiction that you are papering up to leave. - Any additional Lawful claims you choose to record (like land patents/grants) can be done in a separate recording for publishing. - The Michigan Assembly invites you to study our education guidance. - We welcome you back to the land and soil as true Americans. The following is transcribed from Anna's webinar # 132 on 9-20-21 Justice Anna Von Reitz - "When you study law, it's very important that you have the context and history surrounding the law because that's how you understand what the law actually means, and what its intended use was. "The Supreme court has to interpret the constitutions based on the meaning of the words and the historical context of the contracts based on things as they were some 200 years ago. Well, we have to do the same thing, and we have to do it with the knowledge of the context, the history, the law, and the code that's derived from the law in order to sort this stuff out. "It's really much more complex than people would think. It's not just the constitutions that have to be viewed that way, it's any kind of law, whether it's a convention or a treaty or proclamation... it's really pretty intense, and it takes a good deal of self discipline and discernment and study to be able to figure out how a piece of this puzzle fits, and the further back in time you go the more difficult it is to do. "And it becomes more difficult because often times the records that we have were preserved in Europe, and those records were in the diplomatic language of the times which is French. Not only are you dealing with documents that are 250 years old, you're dealing with them in French." From The Michigan Assembly archivist 2022: Anna's description above of what the Law researcher team goes through in forensic researching should be proof as to why the legal jargon in our status paperwork must be left as is. The status documents are dealing with multiple jurisdictions that have changed our born names into many styles and into many jurisdictions of the airy-fairy world of contracts and concepts of someone else's mind. In addition, when you see the different styled addresses on the documents, ( i.e., Assumed Name ) each style is derived from at least seven different postal jurisdictions. This means that the post offices have allowed the crime of misidentification to occur through their systems making them complicit along with any corporation changing and using any derivative of our names in their world of commerce and politics. The crime of name and title changing is extensive and is a very ancient trick. It has always been kept from the public, accept that now we have the internet and many hundreds of Federation Law researchers. The Federation Law researchers have had to decipher each foreign legal law whereas each law differs from the next, and then may change over time. The result of the discovery of extensive fraud has been cited into Once we sign our bylines, etc., and record and publish them, boom!, we've anchored our names back home for good, and into our own copyright ownership. In July of 1779 the Founders faced a problem: how to identify Americans versus Brits and Dutch and Swedes and other nationalities living here in this country. The 1779 Naturalization Act was the answer. It was a very simple requirement by which our Forefathers identified themselves as Americans and not Brits, not French, not... or any of the other options that were available in the Colonial America. We have been facing a similar problem today, in that our Federal Subcontractors have proliferated and promoted their citizenship(s) as separate political statuses, and have created False Registrations as Territorial U.S. Citizens and as Municipal 'citizens of the United States' in our names without our knowledge or consent. Once again, we need to declare our political status as Americans. So, we use The 1779 Naturalization Act and we provide some necessary updates by which Americans, both those born within the physical borders of the States, and those who have been Naturalized as United States Citizens, may establish and/or re-verify their political status via recording their Declarations with their State Assemblies.
1. Items You Need to Complete the Process of Correcting Your Political Status
2. Fees for Recording and Publishing
2. Letter Notices w/returned Green Cards: $25 for Publishing
3. Credential Cards: $50
4. Set of 928's: $25 for Recording, $25 for Publishing
5. Additional Documents: $10 for Recording, $10 for Publishing
3. Set Up and Use Your LRO Account
2. Click on the button that says Add Item
3. Click on the small arrows next to the words 'choose item'
4. Click on the item you are making a payment for
5. In the Fee box type the fee amount
6. Repeat for multiple items
7. Submit to start the payment process.
4. Why You Should NOT Change the Legal Jargon in Your Paperwork Documents
1 - the Power of Attorney (when assigning "power" to someone else) or ...
2 - the Paramount Claim (i.e., home birth, where the placenta is in guardianship of the family).
For guidance on forming the verbiage, please contact our recording secretaries, or archivist.
- The documents cite all those onion layers, and steps us back to our homeland that our name
was stolen from.
- We are volunteers with regular jobs who want to assist everyone to get out of the corporate grip.
5. Law - History - Archeology - the Challenge of the Research
our status forms.
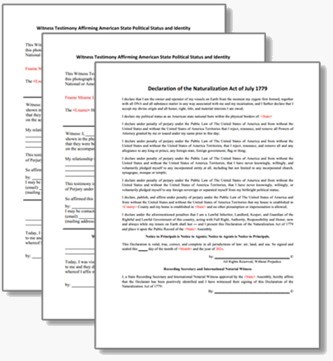
6. What is the 1779 Declaration aka the One Pager
A. Declaration of the Naturalization Act 1779
_____
Depending on where you were born and what your employment status is you will need to select the correct one-page form from the required 1779 forms listed below.
Important: It’s advised at this time to download the documents for ‘State of State’ Notary. Do not use the Recording Secretary version documents unless you have already made arrangement with your RS to meet in person.
- Declaration for Americans born in America
- Declaration for Green Card Immigrants
- Declaration for 7 year Undocumented Immigrants
- Declaration for Naturalized Immigrants
- Declaration for Federal Employees
Download the one that applies to you on the Correct Your Status page under the title: Streamlined Correction Process Documents. Note: Be sure to read the supplied instructions on that page.
Instructions for filling out this document:
- Change the text to your information that is in red, at this point, leave it red.
- Check the words in the notary block that apply to you (man, woman, he, she) to make sure they are correct.
- Full name means all the names in your name, typed under the line of your autograph.
- This name must match the name on your birth certificate.
- Women using a married name will include nee with maiden name (nee – meaning previous), Jane Doe (nee Smith).
- You can remove the word Seal and the document number at the bottom.
- Note: Before taking this to the notary, send it to your Recording Secretary for review, showing red changes. By this time you should have received emails with instructions on how to reach your RS.
- Your autograph should be Printed in Blue Ink with the by: in front and copyright sign behind it. (This is done in front of the notary.)
- Have a Blue Ink pen for your notary if they don’t have one.
- A red thumbprint will be added touching your name. (You can do this at home after notary.)
- Make a color scanned PDF of the completed document, send to your Recording Secretary for uploading to the LRO.
Review this: 1779 Example Additional Reading: Article #2593 and Article #2983
B. 2 Witness Testimony Affirmations
_____
Important: It’s advised at this time to download the documents for ‘State of State’ Notary.
- Witnesses should be at least 21 years old and have known you for 7 years or more.
- Witnesses do not need to be ASN’s, choose from family members, friends, co-workers, etc.
- Attach your in-color (2 x 2″, 300 dpi) photo to each Witness Testimony.
- Witnesses should use Blue Ink to fill out the Witness Affirmation forms.
- Witness Testimonies need to be signed and dated in Blue Ink in the presence of the notary.
- Have a Blue Ink pen for your notary if they don’t have one.
- Make a color scanned PDF of the completed documents, send to your Recording Secretary for uploading to the LRO.
Obtain Passport-Quality Color Photo (Even if you are doing it)
- Make sure to use a clean white background for your photo.
- Ensure to use 300 dpi photo resolution, print quality.
- Crop your photo at 640 pixels x 640 pixels and scale it down to 2 x 2″
- Get at least 3 copies of your color passport-quality photo print
- If using physical photo on your Witness Testimonies, affix the with adhesive, no staples.
- Get or make a digital copy of your photo in jpg/jpeg format for upload to the LRO
Download this Witness Testimony Guide Sheet Who to choose for witnesses: Article #1687
C. Your Birth Certificate
_____
You will need to scan and make a PDF of your Birth Certificate or your Certificate of Live Birth to go along with the other documents to show proof of your name at birth. This will be kept private, hidden from public eyes.
If you do not have one, you can order a certified copy of your Certificate of Live Birth from the County Recorder’s office of the county you were born in. (This is most likely the easiest of the two.) This certificate should have your name in upper/lower case letters. And you can order your Birth Certificate, also called Certificate of Birth (no word live on it) from the State Vital Records Office, via VitalChek. This is the certificate created by the State that will have your name in ALL CAPS. (Important: You do not need an authenticated version of your Birth Certificate. Those are used when traveling overseas, if you lose your passport, an authenticated BC will get you back home.)
If you have not done so, you can read much more about Birth Certificates on the Learn More page.
On the Land and Soil
_____
Once all of your documents have been notarized, you need to scan and make PDFs of them to send to your Recording Secretary so they can be published onto the LRO.
Tip: Before scanning your documents, use a pencil to ‘very lightly’ rub over the raised areas of the embossed seal, it needs to be seen and this will make it show better on the scan.
That’s it, this is all you need to do to get on the land and soil. But…. why then are those ‘other documents’ listed on the Correct Your Status page? Because…. these are documents you’ll need right after you become an American State National, so it is highly recommended that you do these at the same time as you do the above documents.
D. Declaration of Political Status
This is a simple one page document that declares that you have returned to your birthright political status. Sending a copy of this with a letter to the Secretary of State gives you additional protection. By having it completed right away, you can send it out as soon as you become an American State National. (More about this on Guide Steps 3 page.)
- Change the text to your information that is in red, at this point, leave it red.
- Check the words in the notary block that apply to you (man, woman, he, she) to make sure they are correct.
- Type your full name under the line for your autograph.
- Women using a married name will include nee with maiden name (nee – meaning previous), Jane Mary Doe (nee Smith).
- Note: Before taking this to the notary, send it to your Recording Secretary for review, showing red changes.
- Your autograph will be your full name, in Cursive Script in Blue Ink, starting with 'by: ending with ©'
- This document requires the embossed seal and stamp of the notary.
- A red thumbprint will be added touching your name. (You can do this at home after notary.)
- Have a Blue Ink pen for your notary if they don’t have one.
- Make a color scanned PDF of the completed document, send to your Recording Secretary for uploading to the LRO.
Learn more about why it is vital to send a copy of this Declaration to the Sec. of State. Article # 2446
E. Common Carry Declaration
A one page document that declares that you reserve the right to responsibly exercise the right to bear arms and uphold the public law. You have the right, but that doesn't mean you have to carry. This right is declared on the back of the Credential Cards, so you will want to have this document completed before ordering your cards. Doing this document at the same time as the others above means you can order your cards as soon as you become an American State National.
- Change the text that is in red, at this point, leave it red.
- At this time, you will choose National in the first line of the document.
- Check the words in the notary block that apply to you (man, woman, he, she) to make sure they are correct.
- Type your full name under the line for your autograph.
- Note: Before taking this to the notary, send it to your Recording Secretary for review, showing red changes.
- Your autograph will be your current full name, in Cursive Script in Blue Ink, starting with 'by: ending with ©'
- This document requires the embossed seal and stamp of the notary.
- A red thumbprint will be added touching your name. (You can do this at home after notary.)
- Have a Blue Ink pen for your notary if they don’t have one.
- Make a color scanned PDF of the completed document, send to your Recording Secretary for uploading to the LRO.
Learn more about this Common Carry topic: Article # 2907
F. Baby Deed of Land Recording
The Baby Deed of Land Recording is to help parents and put an end to the salvaging of American babies by the corporate vermin by trafficking them into the corporate world. It records the lawful birth of a living heir. Learn more: Article #2341
- The Baby Deed is completed in all red type.
- When you download this document it will include a completed example for you to follow.
- The Land Deed Recording Number at the top is taken from the Registered Mail Sticker used to mail this document to the Secretary of State. More information about this on the Guide Steps 3 page.
- Note: Before taking this to the notary, send it to your Recording Secretary for review.
- As Witness, you will autograph with full name and © symbol in Cursive Script with Red Ink in front of the notary.
- A red thumbprint will be added touching your name. (You can do this at home after notary.)
- The notary will sign in Blue Ink.
- Make a color scanned PDF of the completed document, send to your Recording Secretary for uploading to the LRO.
G. Solemn Record and Proclamation of Lawful Marriage
A marriage between a living man and a living woman. If a Justice of the Peace officiates, the Marriage is under the Law of Michigan, Law of Ohio, etc. If a member of the clergy officiates, the Marriage is under the Law of Scripture - whichever scripture applies. For all purposes international, the Marriage is under the Law of Nations as a Simple Treaty.
- This paperwork is intended for couples when both are American State Nationals.
- When you download this document, there is a second page listing the instructions.
- Change the red text on the document with your information.
- When you are sure everything is correct, change all the text to black.
- Witnesses will autograph in Cursive Script in Blue Ink with a red thumbprint.
- Make a color scanned PDF of the completed document, send to your Recording Secretary for uploading to the LRO.
Read this page for more detailed instructions on Lawful Marriage Paperwork.
H. Recording Cover Sheet
The Cover Sheet is not required when publishing your documents on the LRO with The Federation. But if you will be recording your paperwork with your local County Recorder's Office, then you will want to include a Cover Sheet.
I. Diagram of the Fraud
This diagram shows the largest fraud in the history of the civilized world. If you have a PDF editor, you can replace the sample names with your names and use this document as a teaching tool if deciding to attach it to other documents.
Go to Guide Steps 2 for Letters | Guide Steps 3 for Credential Cards | Guide Steps 4 for 928’s